Download Canon MG2522 Driver in Seconds

To use your Canon MG2522 printer, installing the Canon MG2522 driver on your computer is essential. The driver links your computer and the printer, enabling you to send print jobs and other commands. If you do not install the Canon MG2522 driver, the printer can not work. This post will guide you through downloading and installing the Canon MG2522 driver on your Windows or Mac computer. If you’re eager to start using your Canon MG2522 printer, keep reading for step-by-step instructions.

Downloading and installing the Canon MG2522 driver

Sponsored Links
You should download the printer driver from an official source. In this article, we show you how to download the driver for Canon MG2522 from the Canon homepage that is compatible with your operating system. At the same time, we also provide the direct download Canon driver link to save you time.

Finding the Canon MG2522 driver

Step 1: Visit this site: https://www.usa.canon.com/support/p/pixma-mg2522 Step 2: Select the Operating system and Version compatible with your OS. Step 3: Download the driver In the RECOMMENDED section

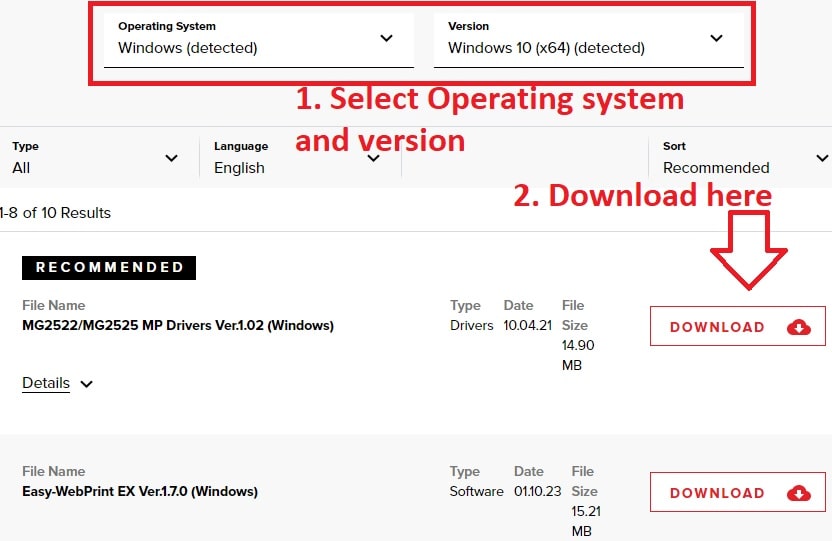
Direct link to download Canon MG2522 driver

OS Link Download
Windows 11 32bit Download here
Windows 11 64bit Download here
Windows 7,8,10,11 32bit Download here
Windows 7,8,10,11 64bit Download here
Mac OS Ventura V13 Download here

Installing the Canon MG2522 Driver for Windows

+ Once the download is complete, locate the downloaded file and double-click on it to start the installation process. + Follow the on-screen prompts to select your language, agree to the license agreement, and choose the installation location. + Select the “Easy Install” option and click on the “Install” button. + Wait for the installation to complete. + Once the installation is complete, click on the “Exit” button to close the installation wizard. + Connect your Canon MG2522 printer to your Windows computer using a USB cable. + Turn on your printer and wait for it to be detected by your computer. + Your Canon MG2522 printer is now ready to use with your Windows computer. Now you can make a print test

Installing the Canon MG2522 Driver for MAC OS

+ Double-click on it to mount the disk image. + Double-click on the mounted disk image to open it. + Double-click on the “Canon IJ” icon to begin the installation process. + Follow the on-screen prompts to select your language, agree to the license agreement, and choose the installation location. + Click on the “Install” button and enter your Mac administrator username and password if prompted. Wait for the installation to complete. + Once the installation is complete, click on the “Close” button to close the installation wizard. + Connect your Canon MG2522 printer to your Mac using a USB cable. + Turn on your printer and wait for it to be detected by your Mac. + Your Canon MG2522 printer is now ready to use with your Mac.

Troubleshooting

When installing the Canon MG2522 driver, there are some common issues that you may encounter. Here are some of them, along with their solutions: + Compatibility issues: You may encounter problems if you download the wrong driver for your operating system. Select the correct operating system from the Canon website’s dropdown menu. + Download failure: If the driver download fails, try again later or from a different internet connection. Also, make sure to download the driver from the official Canon website. + Installation failure: If the driver installation fails, try the following solutions: – Uninstall the existing driver and reinstall it. – Make sure that your computer meets the driver’s system requirements. – Download driver from Canon official website and try again. – Run the installation program as an administrator. + Printer not detected: If your computer can’t detect the printer, try the following solutions: – Ensure the printer is turned on and properly connected to your computer. – Restart your computer and try again. – Uninstall and reinstall the driver. + Slow printing: If your printer is printing slowly, try the following solutions: – Change the printer settings to “Draft” or “Fast” mode. – Decrease the print quality to “Low” or “Normal.” – Make sure that you’re using the correct paper type and size.
Sponsored Links